ActionScript 3: Basic Class
An ActionScript 3 class is arguably the best method for a programmer to create, manipulate, and share their Flash animations and scripts. Placing classes into their own file within a package helps coders reuse their old code as well as utilize other programmer’s expertise in certain instances where they need an external class to accomplish a full-featured file.
In this tutorial, we will give a basic introduction to using classes and packages in ActionScript 3. This tutorial assumes that you are using Flash CS4 on a Windows or Mac computer. Source code can be found at the end of this article.
Part One: Setting up a new class
Let’s open up Flash CS4 and create a new Flash project. The file should use ActionScript 3. We will save it in a folder called basic_class and name it basic_class.fla.
Next we will make the ActionScript 3 package and class that will be used by this Flash movie. Make a new ActionScript 3 file from the File->New menu (or press CTRL+N/CMD+N) and copy this code into it:
[as3]
/* BasicClass.as
// electrokami.com
// BasicClass tutorial
// 10.24.2009
*/
package com.electrokami{
import flash.display.MovieClip;
public class BasicClass extends MovieClip{
private var textMessage:String;
public function BasicClass():void{
textMessage = "Hello World";
trace("Printing: " + textMessage);
}
}// end class
}// end package
[/as3]
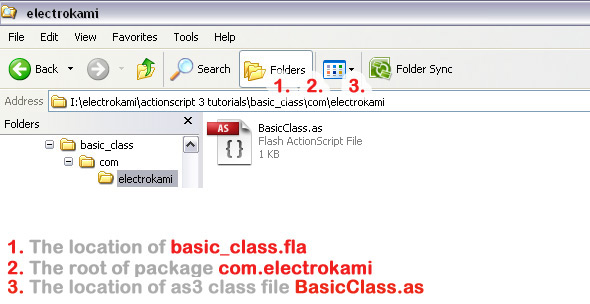
Now save this ActionScript file inside a folder called “electrokami” inside of another folder called “com”, which is in the same level folder as your basic_class.fla file. See picture below.

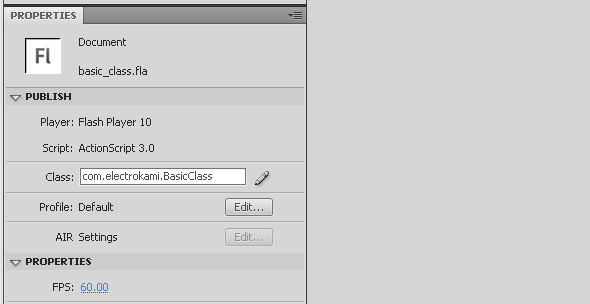
Once that folder structure is in place and the files are in their correct locations, the last thing we need to do is connect the .fla to the .as. Flash CS4 makes this pretty easy- it gives us a box in the properties that lets us type in the name of our class, which is com.electrokami.BasicClass.

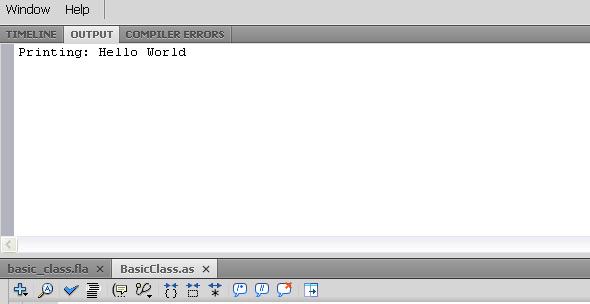
Save the fla file and then press CTRL+Enter/CMD+Enter. Your output panel at the top should have the text “Printing: Hello World” inside of it.

Part Two: What does it all mean?
Now it’s time to breakdown what everything in the code means to both us and the Flash movie, starting with this line:
[as3]
package com.electrokami
[/as3]
This is the package definiton- a package is a container for classes. Anything inside of the folder called electrokami is part of that package.
Why the com you may ask? When using packages, it is considered conventional to name your package after your organization’s domain, in a reverse order. Therefore, ActionScript packages from electrokami.com are named com.electrokami.
Also, it’s best practice to make your packages all lowercase. Simple right? Weird too maybe? Ah well, you’ll get over it!
Next we have this line:
[as3]
import flash.display.MovieClip;
[/as3]
This line basically tells the Flash compiler to load this class into the Flash movie, as we will need to use it. We also use this area to import any and all classes that we will need in order to make our Flash movie function. For instance, we could also add an import that loads mouse events or text fields:
[as3]
import flash.text.TextField;
import flash.events.MouseEvent;
[/as3]
Next is the class definition:
[as3]
public class BasicClass extends MovieClip{
[/as3]
The class definition is the name of the class and any relevant data about the class, such as whether it extends another class (in this case our class extends MovieClip and therefore access to some of its functions).
Typically you want to make your class names start with an uppercase. Since this class is included in the com.electrokami package, it also has a fully qualified class name, which is electrokami.BasicClass.
Right after the class definition comes an instance variable:
[as3]
private var textMessage:String;
[/as3]
This is a private variable that can only be used inside the class by functions from within the class. If we do not set the Access-Control for this variable, it is automatically made into an internal variable, allowing package-wide access. Conversely, a public variable can be accessed inside and outside of the package.
You might want to make your instance variables private if your class needs them to be safely encapsulated from outside code.
Now lets look at the constructor method, the function that will be called when the class is initialized. It must be named after the class exactly, case and all. While you don’t need to declare a constructor, you should always have one (you don’t necessarily have to put any code inside of it). It is also best practice to make sure that your constructor method is public.
Lastly, we will look at two lines of code inside the constructor method:
[as3]
textMessage = "Hello World";
trace("Printing: " + textMessage);
[/as3]
This code is what produces the text in the output window when you run the movie inside of a Flash IDE (Integrated Developer Environment) such as Flash CS4. We first set the instance variable string to the text “Hello World” and then we displayed this in a message using trace().
Notice that we can add additional strings to this message while we send it through the trace() function.
trace() will be one of your best friends when it comes to debugging your applications.
Part Three: Okay, now what?
Let’s make this application do something. We are going to put in a text box that changes when users mouse over the text. Here is the code that we need to accomplish this:
[as3]
/* BasicClass.as
// electrokami.com
// BasicClass tutorial
// 10.24.2009
*/
package com.electrokami{
import flash.display.MovieClip;
import flash.events.MouseEvent;
import flash.text.TextField;
public class BasicClass extends MovieClip{
private var textFieldMessage:TextField;
public function BasicClass():void{
textFieldMessage = new TextField();
textFieldMessage.selectable = false;
textFieldMessage.width = 200;
textFieldMessage.text ="Hello World";
addChild(textFieldMessage);
textFieldMessage.addEventListener(MouseEvent.MOUSE_OVER, mouseOverText);
textFieldMessage.addEventListener(MouseEvent.MOUSE_OUT, mouseOutText);
}
private function mouseOverText(e:MouseEvent):void{
textFieldMessage.text ="Thanks for reading the tutorial!";
textFieldMessage.textColor = 0xaaaaaa;
}
private function mouseOutText(e:MouseEvent):void{
textFieldMessage.text ="Hello World";
textFieldMessage.textColor = 0x000000;
}
}// end class
}// end package
[/as3]
We start by importing the MouseEvent and TextField classes as well as making a private variable that is of type TextField.
[as3]
package com.electrokami{
import flash.display.MovieClip;
import flash.events.MouseEvent;
import flash.text.TextField;
public class BasicClass extends MovieClip{
private var textFieldMessage:TextField;
[/as3]
After that, we initialize our private instance variable textFieldMessage by making it into a new TextField object, making it un-selectable text, making it 200px wide, and setting the default text to “Hello World”.
[as3]
textFieldMessage = new TextField();
textFieldMessage.selectable = false;
textFieldMessage.width = 200;
textFieldMessage.text ="Hello World";
[/as3]
Once we have the text formatted and ready for use, we need to display it inside of the movie so that everyone can see it. This is done by one line of code:
[as3]
addChild(textFieldMessage);
[/as3]
Next we add in the mouse functionality, and it couldn’t be any easier! We place two EventListeners onto the textFieldMessage object, one for mousing over, and one for mousing out.
The MouseEvent.MOUSE_OVER listener will fire the function mouseOverText() whenever a user places their mouse over the text in the movie and the MouseEvent.MOUSE_OUT listener will fire the function mouseOutText() whenever a user removes their mouse from the text in the movie.
[as3]
textFieldMessage.addEventListener(MouseEvent.MOUSE_OVER, mouseOverText);
textFieldMessage.addEventListener(MouseEvent.MOUSE_OUT, mouseOutText);
[/as3]
At this point, all of the code in the constructor is now completed. The Flash file begins to render the first frame of the movie, which is comprised of all of the output from the previously executed code.
On top of that, there are two EventListeners running that will fire off their own relative functions when the user activates them. At this point we see the text “Hello World” inside of the flash movie and see it change when we mouse over it:
[kml_flashembed publishmethod=”static” fversion=”9.0.0″ movie=”http://electrokami.com/wp-content/uploads/2009/10/basic_class.swf” width=”590″ height=”100″ targetclass=”flashmovie”]
[/kml_flashembed]
The final chunk of code to that accomplishes the text change is placed inside of the two functions that are called when the relative EventListener is fire:
[as3]
private function mouseOverText(e:MouseEvent):void{
textFieldMessage.text ="Thanks for reading the tutorial!";
textFieldMessage.textColor = 0xaaaaaa;
}
private function mouseOutText(e:MouseEvent):void{
textFieldMessage.text ="Hello World";
textFieldMessage.textColor = 0x000000;
}
[/as3]
The first function seen, mouseOverText, is called when the user moves their mouse over the text object textFieldMessage. We use the first line in that method to change the text content and the second to change the color to an electrokami gray.
Once the user moves the mouse away from the TextField object textFieldMessage, the function mouseOutText changes the text and color back to the original values. Simple right?
And, as promised, here is the source file for this tutorial:
Download: basic_class.zip


