
HOW TO: Increase productivity with some simple scripts using PHP include, require, include_once, and require_once
The problem
Your website has a consistent navigation and uses the same CSS and JavaScript files throughout all of the pages. Often when people first build websites they use separate HTML files for each page. This leads to issues down the line when updates or bug fixes are needed, and can be complicated even further when there are tons of pages.
With the simple addition of PHP and the include statement, you can streamline this process dramatically, as well as get your feet wet with some dynamic website building.
Introducing PHP include
In PHP, you can use special commands that tell the server to insert the content of one PHP file into another PHP file before it is executed. The contents of the external PHP files can be essentially anything – more PHP, HTML, CSS, JavaScript, config variables, Flash applications, etc.
The include and require statements are available to insert useful codes written in other files, in the flow of execution.
PHP ‘include’ vs ‘include_once’ vs ‘require’ vs ‘require_once’
There are several ways to include outside files into your PHP script:
- include
when the file is not required and application flow should continue when not found - include_once
optional dependencies that would produce errors on subsequent loading or maybe remote file inclusion that you do not want to happen twice due to the HTTP overhead - require
when the file is required by your application - require_once
when the file contains content that would produce an error on subsequent inclusion
We recommend require_once for most use-cases, as it will provide the most consistent expectation. Remember that if you do in fact want to load the file multiple times, just use ‘require’.
Setting up a simple PHP server-side include
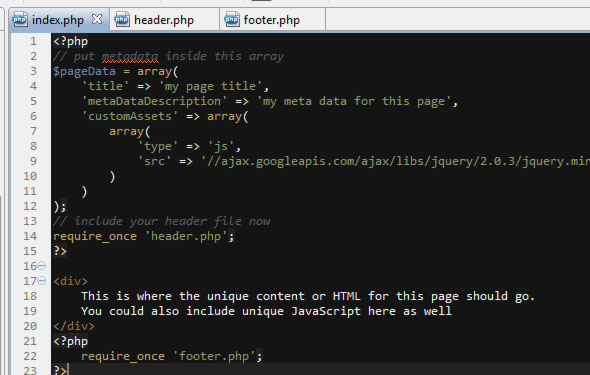
Assuming you have PHP installed on your server already, all you need to do is make a page file, say index.php, and include this code:
[php htmlscript=”true”]
<?php
// put metadata inside this array
$pageData = array(
‘title’ => ‘my page title’,
‘metaDataDescription’ => ‘my meta data for this page’,
‘customAssets’ => array(
array(
‘type’ => ‘js’,
‘src’ => ‘//ajax.googleapis.com/ajax/libs/jquery/2.0.3/jquery.min.js’
)
)
);
// include your header file now
require_once ‘header.php’;
?>
<div>
This is where the unique content or HTML for this page should go.
You could also include unique JavaScript here as well
</div>
<?php
require_once ‘footer.php’;
?>
[/php]
After you have that setup, let’s create the header.php file:
[php htmlscript=”true”]
<?php
// TODO add a null check for $pageData
// and fill in with defaults
?>
<!DOCTYPE html>
<html lang="en-US">
<head>
<meta charset="utf-8" />
<title><?php echo $pageData[‘title’];?></title>
<!– add general css and js files here –>
<?php
foreach($pageData[‘customAssets’] as $index => $asset) {
// TODO do some code to write out custom assets
// ex:
if($asset[‘type’] === "js") {
echo ‘<script type="text/javascript" src="’ . $asset[‘src’] . ‘ "></script>’;
}
}?>
<!– use php to get meta data like title, description, keywords… ex: –>
<meta name="description" content="<?php echo $pageData[‘metaDataDescription’];?>" />
<!– add favicon and whatever else in the header here –>
</head>
<body>
[/php]
And the footer.php file:
[html]
<!– for now we just close the body tag — >
<!– we could also add our JavaScript down here to aid in faster load times –>
</body>
</html>
[/html]
And that’s it!
Next Steps
Now all you need to do is setup those three files on your server and try them out! If you have any questions or comments, feel free to ask below.
Also, if anyone one would like additional features added to the tutorial, please let us know!